Git/Hub Main Quest
Git is a free tool that developers install locally on their computers. It tracks changes made to files and allows developers to maintain previous versions and create new versions of their projects. This concept is known as version control — the practice of managing changes to computer files and maintaining different versions of those files.
GitHub is an online service built to run Git in the cloud. Think of it as a combination of social media and a convenience tool for Git; it allows you to store your code online, collaborate with others, and access and revise other people’s code.
Level One:
→ Instructions shown below.
Level Two:
→ A hands-on Git challenge for fine-tuning your version control skills: commit history, branching strategies and merge conflict resolution. You can accept the assignment here.
Level Three:
→ Creating your own project. The instructions can be found here.
Git/Hub Level One
VOCABULARY
-
Repository — A repository is the most basic element of GitHub. They’re easiest to imagine as a project’s folder. A repository contains all of the project files (including documentation), and stores each file’s revision history. Repositories can have multiple collaborators and can be either public or private.
-
Branch — A branch is a parallel version of a repository. It is contained within the repository, but does not affect the primary or main branch allowing you to work freely without disrupting the “live” version. When you’ve made the changes you want to make, you can merge your branch back into the main branch to publish your changes (*note: the main branch used to be called master).
-
Directory — A folder containing one or more files or folders. You can create directories to organize the contents of a repository.
-
Commit — A commit, or “revision”, is an individual change to a file (or set of files). When you make a commit to save your work, Git creates a unique ID (a.k.a. the “SHA” or “hash”) that allows you to keep record of the specific changes committed along with who made them and when. Commits usually contain a commit message which is a brief description of what changes were made.
-
Pull/pull requests — Pull refers to when you are fetching changes and merging them. For instance, if someone has edited the remote file you’re both working on, you’ll want to pull in those changes to your local copy so that it’s up to date. Pull requests are proposed changes to a repository submitted by a user and accepted or rejected by a repository’s collaborators. Like issues, pull requests each have their own discussion forum.
-
Push — To push means to send your committed changes to a remote repository on GitHub.com. For instance, if you change something locally, you can push those changes so that others may access them.
-
Conflicts — Errors that occur when Git cannot automatically combine changes because the same lines of a file were edited differently in two places.
-
Fetch — When you use git fetch, you’re adding changes from the remote repository to your local working branch without committing them. Unlike git pull, fetching allows you to review changes before committing them to your local branch.
-
Fork — A fork is a personal copy of another user’s repository that lives on your account. Forks allow you to freely make changes to a project without affecting the original upstream repository. You can also open a pull request in the upstream repository and keep your fork synced with the latest changes since both repositories are still connected.
-
Clone — A clone is a copy of a repository that lives on your computer instead of on a website’s server somewhere, or the act of making that copy. When you make a clone, you can edit the files in your preferred editor and use Git to keep track of your changes without having to be online. The repository you cloned is still connected to the remote version so that you can push your local changes to the remote to keep them synced when you’re online.
-
Access Token — A token that is used in place of a password when performing Git operations over HTTPS with Git on the command line or the API. Also called a personal access token.
-
Remote — This is the version of a repository or branch that is hosted on a server, most likely GitHub.com. Remote versions can be connected to local clones so that changes can be synced.
-
Local — The version that lives on your computer.
-
Large file storage (Git LFS) — An extension to Git that stores large files (like images, videos, or datasets) outside the normal repository to keep the repo fast and manageable.
-
Version control — A system that records changes to files over time so you can view history, revert mistakes, and collaborate safely.
-
Presentation and documentation (README, etc.) — Files that explain what the project is, how it works, and how to install or use it. The README is the main project description shown on GitHub.
Specific Commands
-
git clone [https://name-of-the-repository-link] -
git branch [branch-name] -
git push -u [remote] [branch-name] -
git branch -d [branch-name] -
git checkout [name-of-your-branch] -
git status -
git add [file]/git add -A/git add . -
git commit -m "commit message" -
git push [remote] [branch-name] -
git pull [remote] -
git revert -
git merge -
git clone -b [branchname] --single-branch [repo-https]
WHAT IS GIT? WHAT IS GITHUB?
Git is a free tool that developers install locally on their computers. It tracks changes made to files and allows developers to maintain previous versions and create new versions of their projects. This concept is known as version control — the practice of managing changes to computer files and maintaining different versions of those files.
GitHub is an online service built to run Git in the cloud. Think of it as a combination of social media and a convenience tool for Git; it allows you to store your code online, collaborate with others, and access and revise other people’s code.
Why do I need to know anything about Git and Github?
Version control is an essential tool in software development. When Instagram, for example, updates their app, do you think they completely overwrite their previous code every time they want to test something? Do they simply discard the code for previous versions? What if multiple developers want to fix the same bug but have different ideas? The preservation of previous versions of projects, apps, websites, etc., is extremely important for debugging and maintaining software quality. It also allows developers to create new solutions without overwriting the current version. Plus, it makes collaboration a million times easier.
Okay, what are the essentials?
First, you need to understand the most basic terminology and commands. Then, you’ll need to know how to transition your projects from just living in IDEs and files on your computer to GitHub, as well as creating new projects through GitHub. You’ll need to be able to push and commit changes, including adding comprehensive commit messages.
Next, you’ll have to be able to interact with other developers’ work, such as pulling, making forks, and submitting pull requests. The end goal is for you to become proficient with local and remote version control, moving your projects to the cloud, grabbing projects from the cloud, and collaborating efficiently with other developers while maintaining version control.
LET’S GET STARTED!
To start, make sure you have Git installed on your computer by following the steps outlined here. After that, we’ll begin by creating our own project using a repository. A repository is the “capsule” of your project on GitHub. Think of it as a folder that holds all the directories and files of your project. When you’re starting a new project, you’re going to want to have some version control. Additionally, you might want a way to access it from multiple devices, as well having a hub for collaboration and sharing.
To create a new repository, You’ll sign into GitHub (creating an account if necessary, and either navigate to the tab on the left, or to the window that appears when clicking your profile picture and clicking your repositories. Then, there will be a green box that reads new.

At this point, you’ll be able to name your repository, fiddle with privacy settings, add a description, and initialize a README file. A README file is a file that most repositories contain, which is written in Markdown, and provides context or necessary information for the project. Once you’re happy with the settings, you can click create repository, and you’ll have a new repository!
YOU’VE CREATED YOUR REPOSITORY ON GITHUB! WHAT NEXT?
It’s important to remember that you’ve only created the remote repository. This means that it’s hosted on GitHub, and you don’t have access to it locally on your machine. Luckily, there are plenty of commands to help us get this project on your computer!
We’re going to have to clone the repository. To do this, we need our SSH key or HTTPS link. The difference isn’t so important right now, but essentially, SSH allows us to have a more secure connection that requires authentication (a key pair) to communicate with GitHub servers, while HTTPS provides secure communication over the internet. In this case, we’ll start with the HTTPS link.
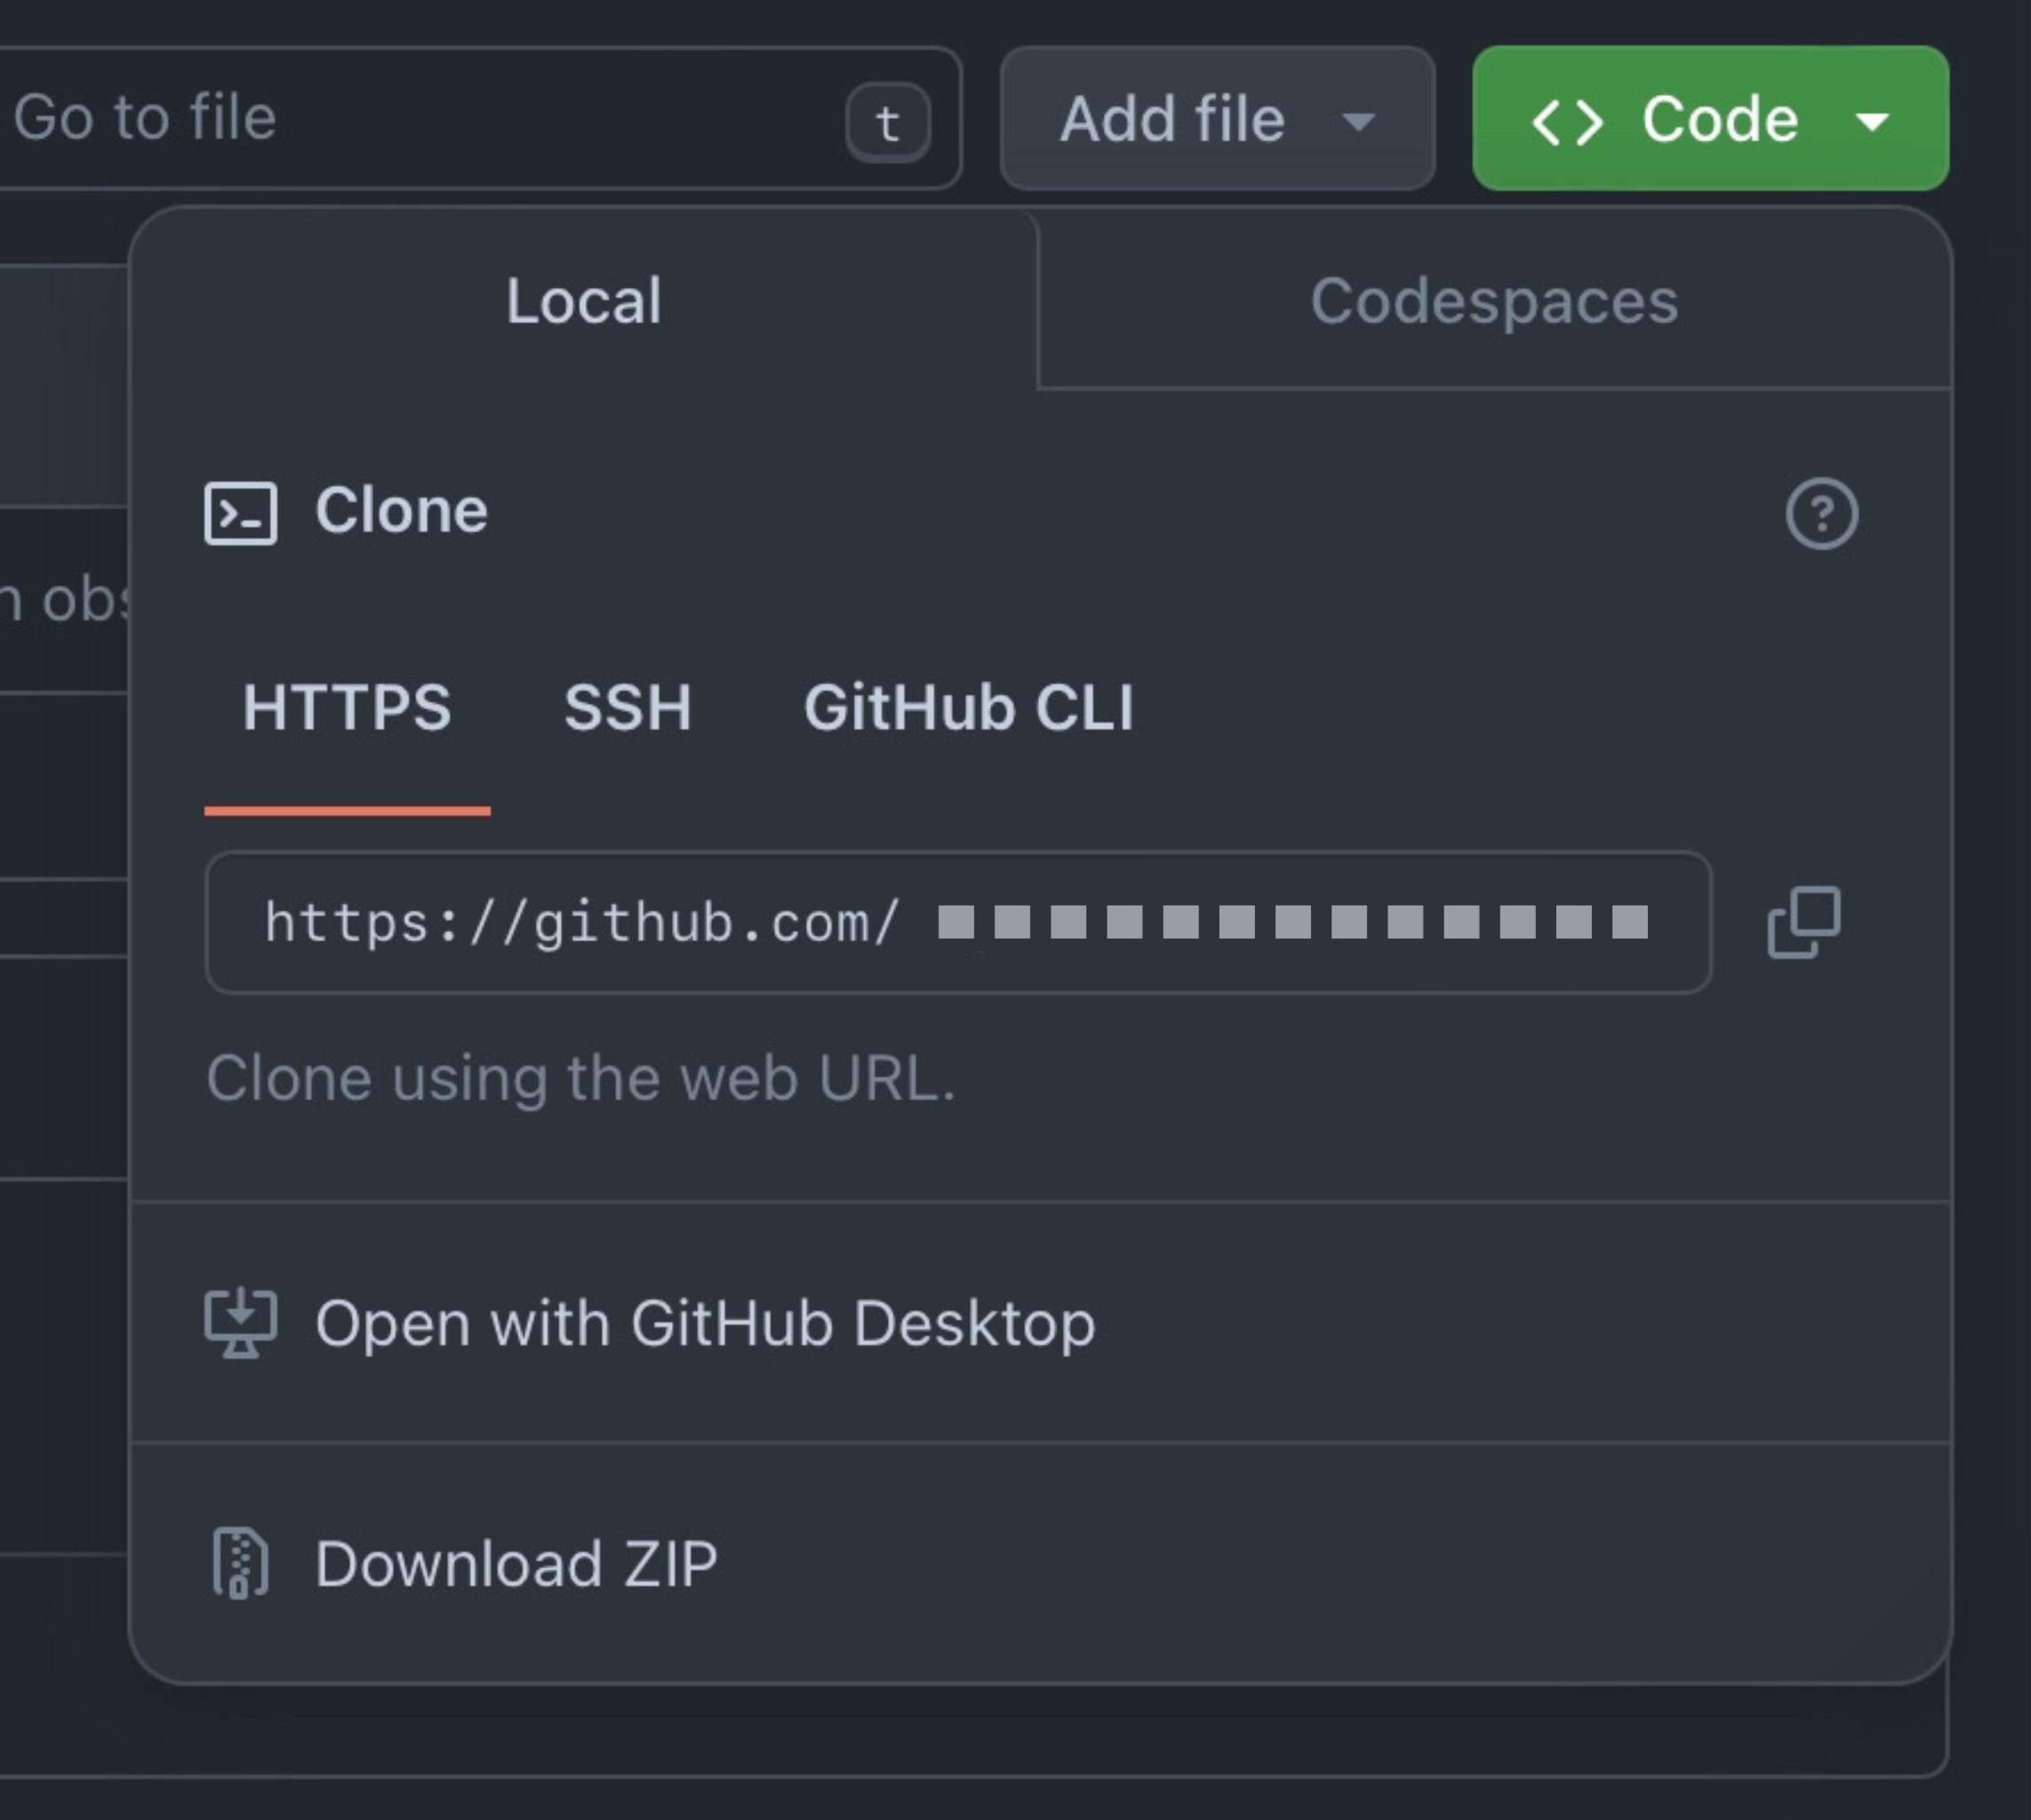
You’re going to want to press the green Code button. Here, you’ll be able to navigate over to HTTPS, and copy the link. To use this, we need to open some kind of terminal (either through your machines terminal or an IDE terminal, such as VSCode, Eclipse, or even the built-in codespace). From there, you’ll type git clone [HTTPS link]. It will ask you where to place the files, and you’ll choose where you want to have your project stored. Now you have a remote repository, which is the repository on GitHub, and the local version, which is what you have stored in files in your computer.
COOL! HOW DO I START MAKING CHANGES TO MY PROJECT?
You’re asking the right questions! As good practice, you’re not really going to want to make any changes directly through GitHub. Instead, you’ll want to make changes locally in your IDE, and then commit and push.
If you don’t really know how to code much yet, don’t worry. You can just create some txt files in the meantime to practice with. If you do, try to create one or two Hello World programs. Remember: this is just learning and practice! This doesn’t have to be a real project.
When you have some files that you’d like to update the repository with, here’s a general process:
-
You can type
git statusto determine which files have changes in them. -
From here, you can add the specific file(s) using
git add [file], or you can add all the changed files usinggit add -A. -
Now, you’re going to commit these changes, by typing git commit -m “commit message”. In the commit message, you’ll want to add a brief explanation of the changes made. As a rule of thumb, try to commit as frequently as possible. This is important for version control. Mistakes happen, and sometimes we want to revert to previous versions of our projects. Having frequent “saves” allows us the freedom to make mistakes and try new approaches without worrying about losing progress. Plus, it helps collaborators understand the changes made to the program (note: you may be asked to identify yourself using the
git config --global user.email "[email]"command. Once you tell it your email, you can try to rungit commit -magain and it should work!). -
Finally, you’re ready to push your changes to the remote repository. Simply type
git push, and your changes will be reflected in GitHub!
Now, let’s get back to GitHub. Right beneath that green Code button, you’ll see some text that reads < x > commits. You can click on this and scroll through all the commits, and look at every change made to your remote repository. In the box with the README file that was created, you should also see the files that you pushed.
PULLING
If you want to work on your project from multiple machines or you have multiple people making commits to the repository, the local and remote version of the repository will often be out of sync. Luckily, there’s a way to make handling this situation more efficient. Use the git pull origin [branch] command. For now, the branch name is main. This will sync your local and remote repositories.
BRANCHES? FORKS?
When collaborating with other programmers within the same repository, there are multiple ways to structure it so that unauthorized changes cannot be made to the files, and outside programmers can suggest their own changes. This is where branches and forks come in. To cut it down to its most basic difference: branches are used by members of the organization, and forks are used by non-members. An organization can be created when a project has a specified team working on it. When you have an organization, you create the repository through that organization, and everyone within that organization effectively owns the repository.
Within an organization, you can create your own branch, where you make and commit your own changes. When you’re done, you can propose that your branch be merged with the main branch through a pull request. If you aren’t a member of the organization, you can still propose changes! Instead, you’ll fork the repository, create your own branch, and then open a pull request. These features are extremely important for large projects with multiple collaborators.
To fork, you’ll have to open a repository and look to the top right for the Fork dropdown. You’ll see a little number that tells you how many forks have been created. You can select create a new fork, which will take you to a page where you can create the repository. There will be a check box for whether to copy only the master/main branch only. If you don’t check this, you’ll copy all the branches. A fork has to be public. You don’t. need permission to fork, but you would need to send a pull request in order to send your changes to the original repository, or to request for the organization/owner to pull your changes. Now you can work freely within your fork without worrying about the changes becoming permanent or affecting the creator/s by cloning the repository
Let’s look at branches. In the top left, you’ll have an < x > branch/es text button. You can click this, and it will take you to a new page that displays all the created branches. In the top right, you’ll see a new branch button and you can click that to create a new branch. You can choose which pre-existing branch to “copy” for your branch, give it a name, and then create it.
In the overview, you’ll be able to see stats about your branch, for example, the time of last update, how many commits it is behind or ahead of its parent branch, and its rules. rules can be created and updated in the settings of the repository.
UPSTREAM/DOWNSTREAM
Often, when you create forks or manually copy repositories, you’ll want a way to keep it updated and synced with the original repositories. To do this, you can add an upstream repository using the command git remote add upstream upstream_repo_url and you can confirm this by using the command git remote -v.
This creates a relationship between these repositories. Upstream to Downstream: Changes in the upstream repository can be merged or pulled into the downstream repository to incorporate new features, bug fixes, or updates. Downstream to Upstream: If someone working on a downstream repository makes improvements or fixes, they can propose these changes back to the upstream repository via pull requests or patches.
GIT MERGE VS REBASE VS FAST FORWARD VS SQUASH COMMIT
Git Merge: Combines changes from one branch into another. It creates a new “merge commit” that has two parent commits, representing the two branches being merged. Typically used when integrating changes from a feature branch into a main branch. It keeps the history of both branches.
Rebase: Reapplies commits from one branch onto another base commit, effectively “moving” the branch to start from a different commit. Used to keep a linear project history by avoiding merge commits. Often used before merging a feature branch to rebase onto the main branch.
Fast Forward: A type of merge that occurs when the branch you are merging into has not diverged from the branch you are merging. Instead of creating a new commit, Git simply moves the branch pointer forward. Occurs when there are no changes on the target branch since the branch being merged was created. This results in a linear history without a merge commit.
Squash Commit: Combines multiple commits into a single commit. This can be done during a merge or a rebase to tidy up commit history. Used to simplify commit history, often before merging a feature branch, by squashing all commits into one. This is helpful when you want to avoid clutter in the commit history with many small, incremental commits.
LARGE FILE STORAGE (LFS)
LFS is an extension to Git that helps manage large files in a repository. You need to install Git LFS separately since it’s not included by default with Git. You can install it using a package manager or by downloading it from the Git LFS website. When you use Git LFS, instead of storing the actual large file in the Git repository, a small pointer file is stored. This pointer file references the large file stored in a separate LFS server. They are stored on a remote LFS server, which can be hosted by services like GitHub, GitLab, or Bitbucket. Also ensure that all collaborators on a project have Git LFS installed and configured, or they may encounter issues with large files. Git LFS is particularly useful in projects involving large media files or datasets that would otherwise bloat a standard Git repository.
CAREER AND CONCLUSION
These were the basics on Git and GitHub! Now that you know what you’re doing, we have one final note about making your personal GitHub page appeal to other people—such as employers.
You can use your GitHub personal page as a way to show off your skills and tell others more about yourself. If you’re applying for internships, jobs, or fellowships, it’s a great idea to pin your top projects to your profile and write brief summaries explaining what you built and what you learned. A clean, active, and well-documented GitHub profile can make a strong impression, especially in technical roles.
You now have the foundational knowledge to contribute to open-source projects, collaborate effectively in teams, and manage your own code with version control. These skills are not just good to have—they’re essential in modern software development. Happy coding :)
HOW TO CONTINUE THIS MAIN QUEST?
Take the quiz here to finalize Level One, then apply your knowledge with Level Two. After completing that, you can complete Level Three for some more self-guided Git practice with instructions.
For any information or quality issues, please contact:
Kaylin Von Bergen (Spark! Code Quest Lead) via GitHub issue
Authors of this Code Quest:
Haji Abdi
Sed Lomani
Kaylin Von Bergen