Flutter Main Quest
Flutter is an open source UI software development kit (SDK) developed by Google which is used for building applications for mobile, web, and desktop that compile natively. It uses Dart, an open-source programming language released by Google in 2011.
Level One:
→ Instructions shown below.
Level Two:
→ A short Flutter exercise where you implement a color picker UI and manage a dynamic list of user-selected colors. You can accept the assignment here.
Level Three:
→ Creating your own project. The instructions can be found here.
Flutter Level One
VOCABULARY
- Dart — Dart is an open-source general-purpose programming language developed by Google. It supports application development in both client and server-side. But it is widely used for the development of android apps, iOS apps, IoT (Internet of Things), and web applications using the Flutter Framework.
- Widget — Widgets are the basic building blocks of the UI—everything a user sees in an app created with Flutter is a widget, from simple elements like text boxes and buttons to layouts, carousels and the entire screen.
- State — State refers to any data that can change over time and affects how a widget looks or behaves. State can change on a timer or on an input.
- Stateful — If a widget is stateful, its state can be changed and the developer must use methods such as
setState()andcreateState()to control it. - Properties — Each widget has properties, and they are values or settings that you can pass to widgets to customize their behavior and appearance.
- BuildContext — An immutable object that provides context about the location of a widget in the widget tree.
- Hot reload — a feature that allows developers to quickly see the results of changes made to the code without needing to restart the entire application.
Typerin the terminal running your application to hot reload. - Routing — The system that controls navigation between screens (pages) in an app. In Flutter, routing determines which widget/screen is shown when a user taps a button, link, or performs an action (for example moving from a home screen to a settings page).
- Gesture Detection — Handling user interactions like taps, swipes, and long presses using
GestureDetector. - Material Design vs. Cupertino Widgets — two distinct sets of UI components in Flutter, each catering to different design languages and platforms—Android and iOS, respectively. Flutter allows you to combine Material and Cupertino widgets in the same app. For instance, you might use a
CupertinoButtonon an iOS platform while using aRaisedButtonon Android. - Emulator — A virtual mobile device that runs on your computer and simulates a real phone or tablet, allowing you to install, run, and test your app without needing a physical device.
SPECIFIC COMMANDS/CODE SNIPPETS
-
setState()— Notifies Flutter that a widget’s data has changed and the UI should rebuild to reflect the update. -
flutter create [projectname]— Generates a new Flutter project with the default folder structure and starter files. -
flutter run— Builds the app and launches it on a connected device or emulator. -
r— Hot reload shortcut in the terminal that refreshes the app UI without restarting the entire application. -
Widget build(BuildContext context)— The required method that describes and returns the UI layout for a widget. -
createState()— Connects a StatefulWidget to its State object where its mutable data and logic are stored. -
flutter doctor— Checks whether the Flutter SDK and required development tools are correctly installed and configured. -
@override— An annotation that indicates a method is replacing a method inherited from a parent class.
WHAT IS FLUTTER?
Flutter is an open source UI software development kit (SDK) developed by Google which is used for building applications for mobile, web, and desktop that compile natively. It uses Dart, an open-source programming language released by Google in 2011.
Why use Flutter over other resources?
Since it compiles natively, it allows developers to create high-quality apps that work across multiple platforms without needing to rewrite code for each platform. Dart is relatively easy to learn for those familiar with languages like JS, Java, or C#. Flutter compiles to native ARM code on mobile, so apps have the performance, look and feel of native apps. For ease in development, it uses hot reload, a tool that allows developers to see the changes in their app in real-time each time they change the code. It has a large user-base (it’s the most popular cross-platform mobile framework worldwide as of 2022, after all), and therefore has an extensive library and good community support.
Why do I need to know anything about Flutter?
App development is a great skill for people in tech to have under their belt. Flutter makes app development easy and efficient. Most companies start with a cross-platform mobile dev framework but, as they get bigger, transition to developing separate, native apps for each platform (i.e., Swift for iOS and Java/Kotlin for Android), so it’s not uncommon for Flutter to be used in industry!
Okay, what are the essentials?
The installation process for Flutter is a little bit more time-consuming than most installations, but this document will include walkthroughs on how to do this. Then, you should start learning the architecture of Flutter, for example, how to use widgets, states, how rendering works, etc. You should be comfortable with Dart syntax (or have enough baseline knowledge of general programming to be able to use documentation or an LLM to help you code in Dart).
FLUTTER ARCHITECTURE!
Before we start doing any coding, let’s learn a little bit about the Flutter Architecture. When apps are released, they are compiled directly into machine code. This is why it’s so much easier to create cross-platform apps. Instead of rewriting your app in multiple languages, you write it in Dart and it gets compiled into Intel x64/ARM instructions (for mobile), or JavaScript (for web).
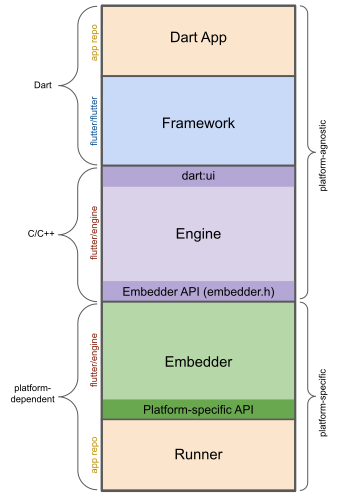
Flutter has three architectural layers: the Framework, Engine, and Embedder.
- The Framework layer is the topmost layer and what you will be looking at the most as a developer. Using Dart code, you’ll be able to build a UI using widgets (we’ll get into these later), control the positioning and layout of these widgets, handle user input such as swiping, tapping, sliding and scaling, and even access APIs for animations and transitions.
- The Engine layer is written mostly in C++, and supports the primitives necessary to support all Flutter applications. It’s responsible for rasterizing composited scenes whenever a new frame needs to be painted. It provides the low-level implementation of Flutter’s core API, including graphics (through Impeller on iOS and coming to Android and macOS, and Skia on other platforms), executes Dart code, manages text rendering, and facilitates interaction with platform specific APIs.
- Finally, the Embedder layer interacts with the underlying OS using platform specific code. It sets up the rendering surface (a window on desktop, a view on mobile), allows for communication between the Flutter app and the underlying platform, and manages platform-specific AIs (think cameras, sensors, file systems, etc.)

STATE!
State is extremely important to understand when working with Flutter. A developer provides a mapping from application state to interface state, and the framework updates the interface at runtime when the application state changes. State refers to any data that can change over time and affects how a widget looks or behaves. State can change on a timer or on an input.
Consider a clock app—state changes automatically when the time changes. State can change on input in the case of a checkbox being checked, a button being pressed, etc.
In Flutter, widgets can be stateless or stateful.
- A StatelessWidget is immutable — you should use them when the widget’s appearance and behavior are determined entirely by its constructor parameters and don’t change over time.
- A StatefulWidget is mutable and can change its appearance or behavior in response to user interactions or other factors, so use it when it needs to update dynamically.
State is managed by Flutter. When the state of a widget changes (for example, when the user presses a button), the framework calls setState(), which tells Flutter to rebuild the widget. During this rebuild, Flutter updates the widget tree, but only the parts of the UI that depend on the changed state are rebuilt. This makes the process efficient.
WIDGETS!
Widgets are the basic building blocks of the UI—everything a user sees in an app created with Flutter is a widget, from simple elements like text boxes and buttons to layouts, carousels and the entire screen. Widgets are composable to create more complex UI elements.
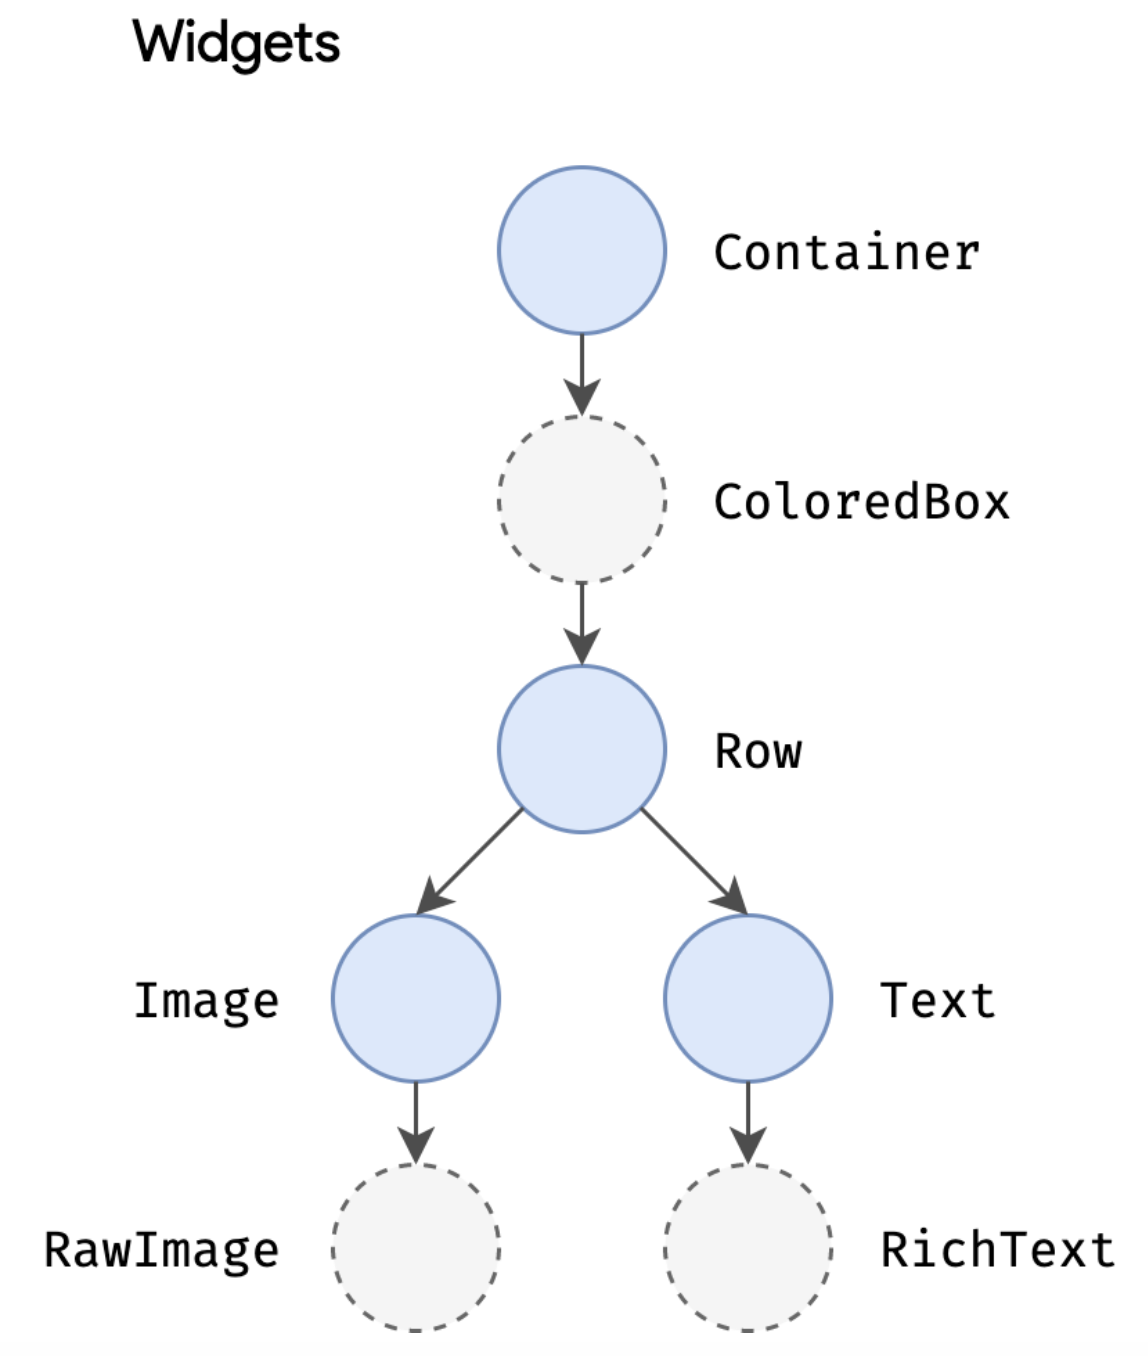
Widgets are organized in a tree structure known as the widget tree. It has a hierarchical structure and represents the entire UI of your app; each widget is embedded into another widget up until the upper-most widget, starting from the container for the entire screen to things like rows, columns and stacks, to leaf elements like text boxes and buttons.
Remember Stateless and Stateful—one declares it to stay the same, and the other allows it to save state. There exist widgets for alignment and padding too, such as the Center widget. They don’t have visual representation on their own but they are there solely to control some aspect of another widget.
State gets managed and passed around the system. Since many widgets may contain state within the tree, it can get cumbersome to pass data down as we get deeper down the tree. In this case, we can utilize an InheritedWidget, which can grab data from a shared ancestor.
Important Widgets to Know :
- Container — One of the most versatile and commonly used widgets. It controls the layout and style of its child widget. You can add padding, margin, alignment, change the background color, add borders, and round its corners. You can also add size constraints. It can contain a single child widget.
- Columns and Rows — allow for a vertical or horizontal layout of a list of child widgets.
- Icons — A collection of pre-designed symbols used to represent common actions, objects and concepts within an app. For example,
Icons.home,Icons.favorite,Icons.search,Icons.settings. You can change the size and color as well as add accessibility text for screen readers. - AppBar — serves as the topmost element of an app’s screen, providing a title, navigation actions (such as a back button), and other key interface buttons. The
actionsproperty allows a developer to add a list of widgets (usuallyIconButtons) to the right side of the AppBar. - ElevatedButton — material design button that features a shadow to give it a 3D effect. It has a property called
onPressedwhich allows the developer to define what happens when the user interacts with it. You can change the style and content (such as text or an icon). - Image — exactly what you think. Has properties that allow you to change the fit, size, alignment, and blend. Sources include assets, files, memory, and network image URLs.
- Scaffold — provides a basic material design visual layout structure. This is where you place the AppBar, Body, Drawer, BottomNavigationBar, Snackbar, etcetera.
LET’S GET STARTED!
The first thing we have to do is install it from https://docs.flutter.dev/get-started/install.
Installing Flutter and optimizing settings can be more complicated than you’re used to, so here’s a walkthrough for Windows, and here is a walkthrough for Mac.
We’re going to get you started with Android Studio development, but it only takes a couple extra steps to develop on Apple too that you can take later. There may be slight differences in versions and such, but they should be easy to figure out.
We’re also going to be using VS Code to do any coding, so make sure you have that installed as well. In VS Code, install the Flutter extension.
Open a new terminal in VS Code and navigate to a file or directory to hold your Flutter projects (using cd [address]). Then, you can type flutter create [projectname] replacing [projectname] with something else, such as spark_walkthrough (note, the name should be all lowercase with underscores to separate words, aka snake_case).
As long as everything is named and installed properly, the project will be created and it will give you the directory that your code is in. Click File → Open Folder, and then find the main folder of your project. As the terminal told you, your application code will be under /lib/main.dart.
NOTE: when you try to run the emulator, your system may ask you to download something else called “Android Emulator hypervisor driver.” Please follow the directions on Android Studio.
EMULATOR
Next, you’re going to want to have an emulator available. An emulator is a software program that simulates another device.
In our case, we’re going to emulate an Android phone so that we can see our app on it as we code it. You should have already set this up with the video tutorial.
In VS Code, in the status bar on the bottom, you’ll be able to click where it says Windows and change it to the device you’re going to emulate.
CODING IN FLUTTER
Let’s look at an example program first; usually, when you create a Flutter project, it opens up with a sample main.dart file. In case it’s empty, here is the code:
import 'package:flutter/material.dart';

void main() {
  runApp(const MyApp());
}

class MyApp extends StatelessWidget {
  const MyApp({super.key});

  @override
  Widget build(BuildContext context) {
    return MaterialApp(
      title: 'Flutter Demo',
      theme: ThemeData(
        colorScheme: ColorScheme.fromSeed(seedColor: Colors.deepPurple),
        useMaterial3: true,
      ),
      home: const MyHomePage(title: 'Flutter Demo Home Page'),
    );
  }
}

class MyHomePage extends StatefulWidget {
  const MyHomePage({super.key, required this.title});

  final String title;

  @override
  State<MyHomePage> createState() => _MyHomePageState();
}

class _MyHomePageState extends State<MyHomePage> {
  int _counter = 0;

  void _incrementCounter() {
    setState(() {
      _counter++;
    });
  }

  @override
  Widget build(BuildContext context) {
    return Scaffold(
      appBar: AppBar(
        backgroundColor: Theme.of(context).colorScheme.inversePrimary,
        title: Text(widget.title),
      ),
      body: Center(
        child: Column(
          mainAxisAlignment: MainAxisAlignment.center,
          children: <Widget>[
            const Text(
              'You have pushed the button this many times:',
            ),
            Text(
              '$_counter',
              style: Theme.of(context).textTheme.headlineMedium,
            ),
          ],
        ),
      ),
      floatingActionButton: FloatingActionButton(
        onPressed: _incrementCounter,
        tooltip: 'Increment',
        child: const Icon(Icons.add),
      ),
    );
  }
}
We’re going to look at this code step by step to try and understand what’s happening and why it does what it does.
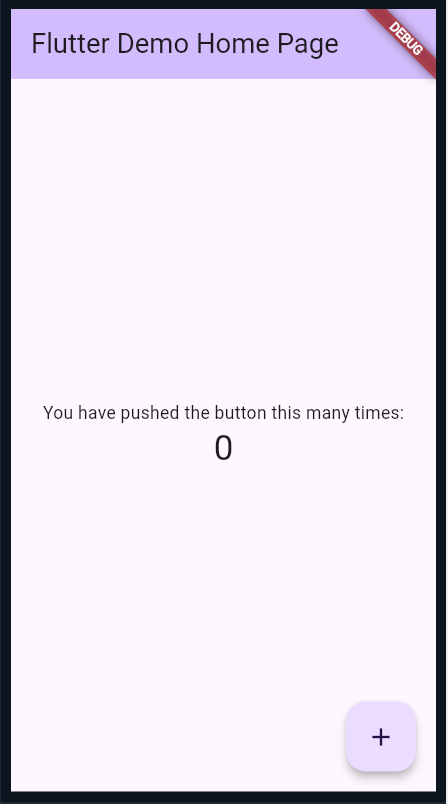
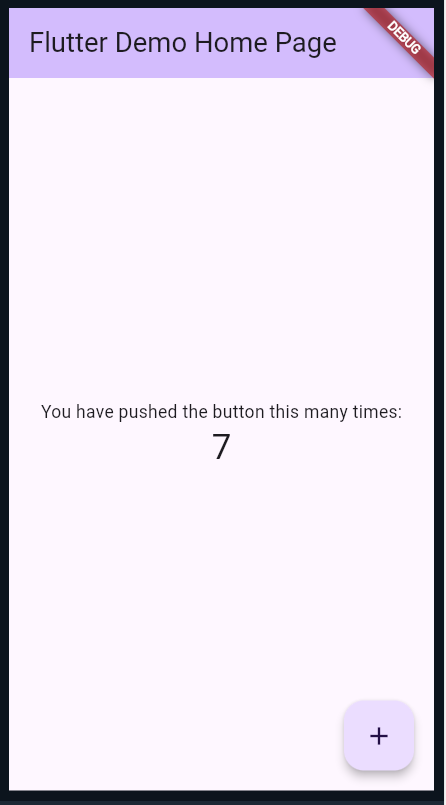
For guidance, here is what the app is supposed to look like on run, and after the button on the bottom right has been pressed seven times.
import 'package:flutter/material.dart';
This line imports the material.dart package, which contains the Material Design widgets and utilities provided by Flutter. It allows you to use pre-built widgets like MaterialApp, Scaffold, Text, and more.
The main function is the entry point of any Dart program; this is where it starts. It uses the function runApp(), which makes the parameter given (the widget MyApp()), and makes that the root of the widget tree.
void main() {
  runApp(const MyApp());
}
Right below the main function is our custom MyApp widget:
class MyApp extends StatelessWidget {
  const MyApp({super.key});

  @override
  Widget build(BuildContext context) {
    return MaterialApp(
      title: 'Flutter Demo',
      theme: ThemeData(
        colorScheme: ColorScheme.fromSeed(seedColor: Colors.deepPurple),
        useMaterial3: true,
      ),
      home: const MyHomePage(title: 'Flutter Demo Home Page'),
    );
  }
}
created using class definitions. Notice the syntax for creating a Stateless vs. Stateful widget; you extend the StatelessWidget or StatefulWidget class.
const MyApp({super.key}); is a constructor for the MyApp class. Marking it as const makes it so that if the inputs are constant, the instance of MyApp can be treated as a compile-time constant. This can improve performance by allowing Dart to reuse the instance instead of creating a new one each time.
super.key passes the key argument to the parent class (StatelessWidget). Keys are special identifiers that help the framework understand how to manage the widgets in the widget tree, especially during complex operations like moving, adding, or removing widgets. They ensure that the state of a widget is maintained and performance is optimized.
We use @override because the build method is overriding the one in the superclass (StatelessWidget).
We are inputting context, which is a BuildContext object. It provides information about the location of this widget in the widget tree. It’s used to access resources like themes and to interact with the widget’s position in the tree. Context is created automatically by Flutter, and you can use this variable later.
It will be returning a MaterialApp widget, which is going to be the root widget of the application. The title:, theme:, and home: fields are all properties.
Each widget has properties (check documentation for full list), which are values or settings that you can pass to widgets to customize their behavior and appearance. Title is straightforward, but the theme and home properties are a little more complicated.
ThemeData is also a widget, and has its own properties; in this case, we are looking at colorScheme and useMaterial3.
Since there are so many widgets, you’ll have to be able to look up how to use certain widgets and what to put in each property.
In the home property, we pass in a homepage that you can see the code for right after.
class _MyHomePageState extends State<MyHomePage> {
  int _counter = 0;

  void _incrementCounter() {
    setState(() {
      _counter++;
    });
  }

  @override
  Widget build(BuildContext context) {
    return Scaffold(
      appBar: AppBar(
        backgroundColor: Theme.of(context).colorScheme.inversePrimary,
        title: Text(widget.title),
      ),
      body: Center(
        child: Column(
          mainAxisAlignment: MainAxisAlignment.center,
          children: <Widget>[
            const Text(
              'You have pushed the button this many times:',
            ),
            Text(
              '$_counter',
              style: Theme.of(context).textTheme.headlineMedium,
            ),
          ],
        ),
      ),
      floatingActionButton: FloatingActionButton(
        onPressed: _incrementCounter,
        tooltip: 'Increment',
        child: const Icon(Icons.add),
      ),
    );
  }
}
Once again, we’re creating a custom widget by using a class definition. This one is Stateful, so we have to give it State!
@override State<MyHomePage> createState() => _MyHomePageState();
creates and returns an instance of the _MyHomePageState class, which is where the mutable state for MyHomePage is managed.
_MyHomePageState extends State<MyHomePage>. It has a variable, _counter, and includes a method which changes the state and increments counter. The setState method notifies Flutter that the state has changed. When setState is called, Flutter schedules a rebuild of the widget tree. During this rebuild, the updated state is reflected, and the UI is updated accordingly.
The state is going to be updated within the Scaffold widget we’re creating. Scaffold has multiple properties: appBar, body, and floatingActionButton.
You should know about the appBar already from the list given a few pages up. The body property uses an alignment widget, Center, and then the child property uses a Column, which also has children.
It takes a lot of playing around to get used to these kinds of widgets, but playing around is good progress. This is why hot reload is a great feature of Flutter!
floatingActionButton is a button, and includes the onPressed property, which calls the incrementCounter method, icons, and tooltip.
Here is our app in the emulator! 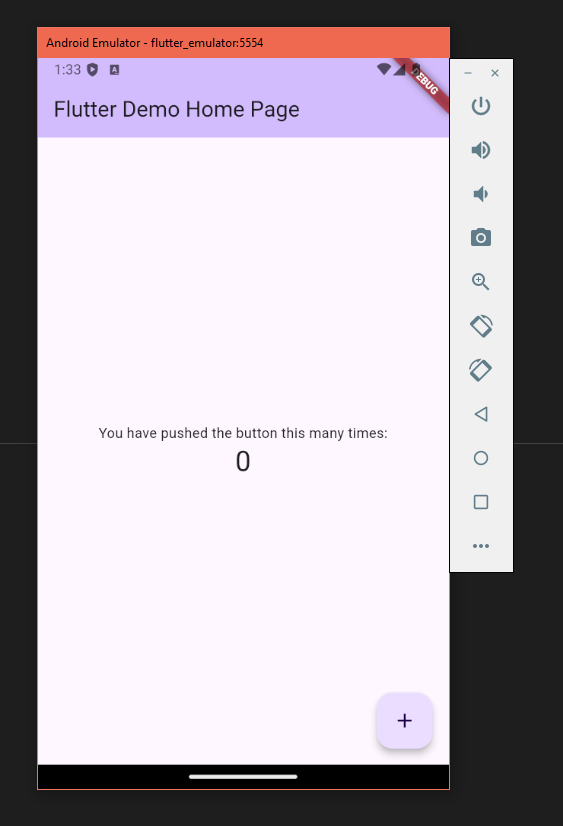 It includes the AppBar at the top, which has the title and uses the color theme (as does the button), the Scaffold, whose body is shown by the text and counter number, and then the button at the bottom right.
Each time the button is pressed, it increments the counter using the _incrementCounter method and the state is changed, meaning the Home page widget gets rebuilt to change the counter number.
CONCLUSION
These are the basics of Flutter. Since there are so many different widgets, we can’t go over each and every one in this document, but this gets you started on understanding the architecture of Flutter and its code.
Documentation can be found at https://flutter.dev/, and whenever you want to learn something new, do so through there.
Additionally, forums and LLMs (such as ChatGPT) can be a great resource.
If you want to get involved in the Flutter community, the FlutterDev subreddit is a good place to look. Additionally, there is a community forum on the Flutter Dev website itself.
Good luck with Flutter!
HOW TO CONTINUE THIS MAIN QUEST?
Take the quiz here to finalize Level One, then apply your knowledge with Level Two. After completing that, you can create your own project with some guidelines for Level Three!
For any information or quality issues, please contact:
Kaylin Von Bergen (Spark! Code Quest Lead) via GitHub issue
Author of this Code Quest:
Kaylin Von Bergen